

How To Create A Windows Service In Visual Studio 2017
This browser is no longer supported.
Upgrade to Microsoft Edge to take advantage of the latest features, security updates, and technical back up.
Tutorial: Create a Node.js and Express app in Visual Studio
Applies to: ![]() Visual Studio
Visual Studio ![]() Visual Studio for Mac
Visual Studio for Mac
This tutorial for Visual Studio development uses Node.js and Limited. In this tutorial, you lot create a simple Node.js web app, add some lawmaking, explore some features of the IDE, and run the app.
In this tutorial, yous learn how to:
- Create a Node.js projection.
- Add some code.
- Use IntelliSense to edit code.
- Run the app.
- Striking a breakpoint in the debugger.
Before yous begin, here's a quick FAQ to introduce you lot to some key concepts:
-
What is Node.js?
Node.js is a server-side JavaScript runtime environment that executes JavaScript lawmaking.
-
What is npm?
A package manager makes it easier to publish and share Node.js source code libraries. The default packet manager for Node.js is npm. The npm package director simplifies library installation, updating, and uninstallation.
-
What is Express?
Express is a server web application framework that Node.js uses to build web apps. With Express, yous can use different front-stop frameworks to create a user interface. This tutorial uses Pug, formerly chosen Jade, for its front end-end framework.
Prerequisites
This tutorial requires the following prerequisites:
-
Visual Studio with the Node.js development workload installed.
If y'all haven't yet installed Visual Studio:
-
Become to the Visual Studio downloads folio to install Visual Studio for gratis.
-
In the Visual Studio Installer, select the Node.js evolution workload, and select Install.
If you have Visual Studio installed already:
-
In Visual Studio, get to Tools > Get Tools and Features.
-
In the Visual Studio Installer, select the Node.js development workload, and select Modify to download and install the workload.
-
-
The Node.js runtime installed:
If you don't have the Node.js runtime installed, install the LTS version from the Node.js website. The LTS version has the best compatibility with other frameworks and libraries.
The Node.js tools in the Visual Studio Node.js workload support both Node.js 32-fleck and 64-bit architecture versions. Visual Studio requires only one version, and the Node.js installer but supports one version at a time.
Visual Studio ordinarily detects the installed Node.js runtime automatically. If not, you lot can configure your project to reference the installed runtime:
-
After y'all create a project, right-click the project node and select Properties.
-
In the Properties pane, set the Node.exe path to reference a global or local installation of Node.js. You can specify the path to a local interpreter in each of your Node.js projects.
-
This tutorial was tested with Node.js 16.14.0.
This tutorial was tested with Node.js 8.10.0.
Create a new Node.js projection
Visual Studio manages files for a single application in a projection. The project includes source code, resource, and configuration files.
In this tutorial, y'all begin with a simple project that has code for a Node.js and Limited app.
-
Open Visual Studio, and select Esc to close the first window.
-
Select Ctrl+Q, enter node.js in the search box, and then select Basic Azure Node.js Express iv Awarding - JavaScript from the dropdown list.
If you don't see the Bones Azure Node.js Limited 4 Awarding choice, y'all need to install the Node.js development workload. For instructions, see Prerequisites.
-
In the Configure your new project dialog box, select Create.
Visual Studio creates the new solution and project, and opens the projection in the correct pane. The app.js project file opens in the editor in the left pane.
-
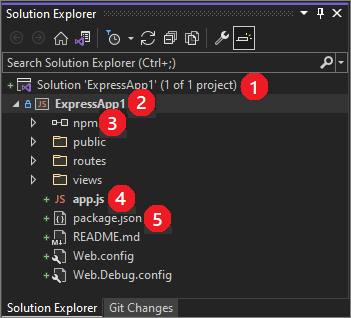
Look at the projection structure in Solution Explorer in the correct pane.
-
At the summit level is the solution (one), which by default has the same name equally your project. A solution, represented by a .sln file on disk, is a container for one or more related projects.
-
Your projection (ii), using the proper noun you gave in the Configure your new projection dialog box, is highlighted in bold. In the file arrangement, the project is a .njsproj file in your project folder.
You tin see and set projection properties and surround variables past correct-clicking the project and selecting Properties from the context menu. You lot can work with other development tools, because the project file doesn't make custom changes to the Node.js projection source.
-
The npm node (iii) shows whatever installed npm packages. You can right-click the npm node to search for and install npm packages past using a dialog box.
Y'all tin install and update packages by using the settings in packet.json and the right-click options in the npm node.
-
Projection files (iv) appear under the project node. The project startup file, app.js, is bold.
You tin can gear up the startup file by correct-clicking a file in the projection and selecting Ready equally Node.js startup file.
-
Npm uses the package.json file (5) to manage dependencies and versions for locally installed packages. For more information, see Manage npm packages.
-
-
Open the npm node to make sure all the required npm packages are present.
If any packages are listed equally (missing), right-click the npm node, select Install npm Packages, and install the missing packages.
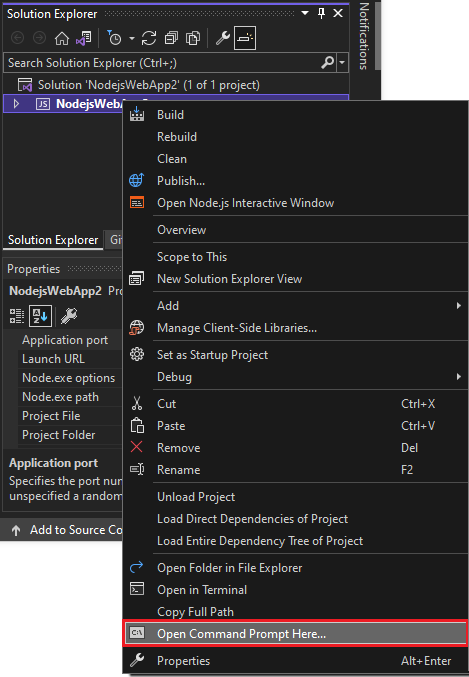
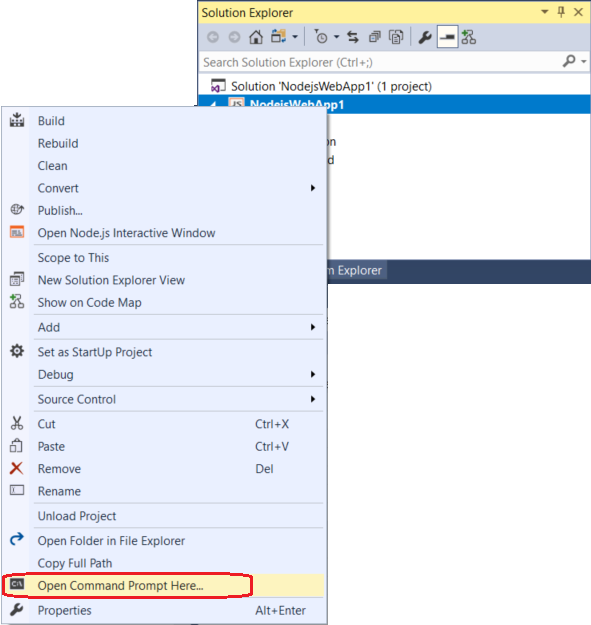
To install npm packages or Node.js commands from a command prompt, right-click the project node and select Open Command Prompt Hither.
-
Open up Visual Studio.
-
Create a new projection.
Select Esc to close the start window. Select Ctrl + Q to open the search box, enter Node.js, and then select Create a new Basic Azure Node.js Express iv application (JavaScript). In the dialog box that appears, select Create.
If you lot don't see the Bones Azure Node.js Express four application project template, you need to add the Node.js development workload. For instructions, see Prerequisites.
Visual Studio creates the new solution and opens your projection in the right pane. The app.js project file opens in the editor (left pane).

(1) Highlighted in bold is your project, using the name you gave in the New Project dialog box. In the file system, this projection is represented by a .njsproj file in your project folder. You can set properties and environment variables associated with the project by right-clicking the projection and choosing Properties. Yous can do round-tripping with other development tools, because the project file doesn't brand custom changes to the Node.js projection source.
(2) At the top level is a solution, which by default has the same name equally your project. A solution, represented by a .sln file on disk, is a container for one or more related projects.
(3) The npm node shows any installed npm packages. You tin can right-click the npm node to search for and install npm packages by using a dialog box. You lot can likewise install and update packages past using the settings in package.json or the right-click options in the npm node.
(4) parcel.json is a file used by npm to manage parcel dependencies and package versions for locally installed packages. For more data, see Manage npm packages.
(5) Project files such as app.js show up nether the project node. app.js is the projection startup file and that's why it's bold. Yous can set the startup file by right-clicking a file in the project and selecting Set as Node.js startup file.
-
Open up the npm node and brand sure that all the required npm packages are present.
If a package is missing, its icon contains an assertion signal. To install whatsoever missing packages, y'all can right-click the npm node and select Install npm Packages.
To install npm packages or Node.js commands from a command prompt, right-click the project node and select Open Command Prompt Here from the context menu.
-
Open Visual Studio.
-
Create a new project.
From the peak menu bar, select File > New > Project. In the left pane of the New Projection dialog box, expand JavaScript, then select Node.js. In the middle pane, select Bones Azure Node.js Express 4 application, then select OK.
If you don't run into the Basic Azure Node.js Express 4 awarding project template, you need to add the Node.js development workload. For instructions, see Prerequisites.
Visual Studio creates the new solution and opens your projection in the correct pane. The app.js project file opens in the editor (left pane).
(1) Highlighted in assuming is your project, using the name you gave in the New Project dialog box. In the file system, this project is represented past a .njsproj file in your projection folder. You can set properties and environment variables associated with the projection by right-clicking the projection and choosing Properties. Yous can do circular-tripping with other development tools, because the project file doesn't make custom changes to the Node.js project source.
(2) At the top level is a solution, which by default has the same name as your projection. A solution, represented by a .sln file on disk, is a container for one or more related projects.
(3) The npm node shows any installed npm packages. You can right-click the npm node to search for and install npm packages past using a dialog box. Yous can too install and update packages by using the settings in package.json or the right-click options in the npm node.
(4) package.json is a file used by npm to manage package dependencies and package versions for locally installed packages. For more information, encounter Manage npm packages.
(5) Project files such as app.js bear witness upwardly under the projection node. app.js is the project startup file and that'south why it'southward bold. You tin can set the startup file by right-clicking a file in the projection and selecting Set as Node.js startup file.
-
Open the npm node and make sure that all the required npm packages are present.
If a package is missing, its icon contains an assertion point. To install whatever missing packages, y'all can right-click the npm node and select Install npm Packages.
To install npm packages or Node.js commands from a command prompt, right-click the project node and select Open up Command Prompt Hither from the context card.
Add some code
The application uses Pug for the forepart-end JavaScript framework. Pug uses elementary markup lawmaking that compiles to HTML.
Pug is prepare as the view engine in app.js, with the code app.gear up('view engine', 'pug');.
-
In Solution Explorer, open the views binder, and and then select index.pug to open up the file.
-
Replace the file contents with the following markup.
extends layout block content h1= title p Welcome to #{title} script. var f1 = function() { document.getElementById('myImage').src='#{data.item1}' } script. var f2 = function() { document.getElementById('myImage').src='#{data.item2}' } script. var f3 = function() { document.getElementById('myImage').src='#{data.item3}' } push(onclick='f1()') Ane! push(onclick='f2()') Two! button(onclick='f3()') Iii! p a: img(id='myImage' height='300' width='300' src='')The preceding code dynamically generates an HTML page with a championship and welcome message. The page likewise includes code to display an epitome that changes whenever y'all select a button.
-
In the routes folder, open alphabetize.js.
-
Add together the following lawmaking before the
router.getfunction call:var getData = function () { var data = { 'item1': 'https://images.unsplash.com/photo-1563422156298-c778a278f9a5', 'item2': 'https://images.unsplash.com/photo-1620173834206-c029bf322dba', 'item3': 'https://images.unsplash.com/photo-1602491673980-73aa38de027a' } return data; }This code creates a data object that y'all laissez passer to the dynamically generated HTML page.
-
Supercede the
router.getfunction phone call with the post-obit code:router.get('/', office (req, res) { res.return('alphabetize', { title: 'Express', "data" }); });The preceding lawmaking sets the electric current page using the Express router object and renders the page, passing the title and information object to the page. The code specifies the alphabetize.pug file every bit the page to load when alphabetize.js runs. The app.js code, not shown here, configures index.js equally the default route.
To demonstrate several Visual Studio features, there's a deliberate error in the line of code that contains
res.render. In the next section, IntelliSense helps you lot fix the error so the app can run.
Utilize IntelliSense
IntelliSense is a Visual Studio tool that helps you as you write code.
-
In index.js in the Visual Studio lawmaking editor, get to the line of lawmaking that contains
res.render. -
Put your cursor subsequently the
"data"string and blazon: go. IntelliSense displays thegetDatarole you defined before in the code. SelectgetData.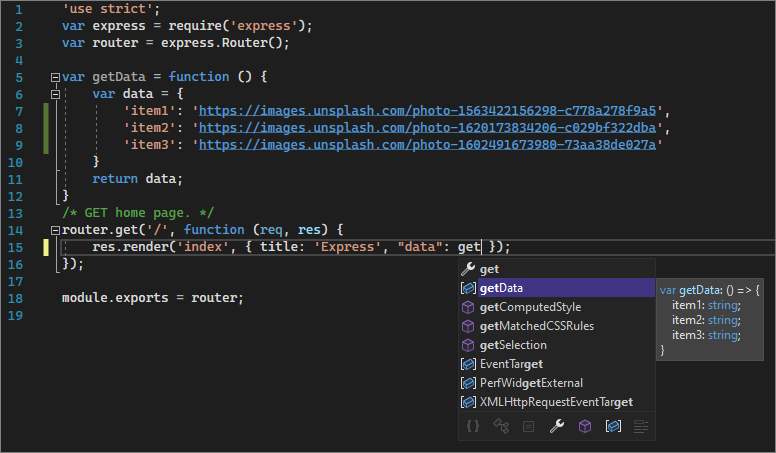
-
Add parentheses to make the code a function call:
getData(). -
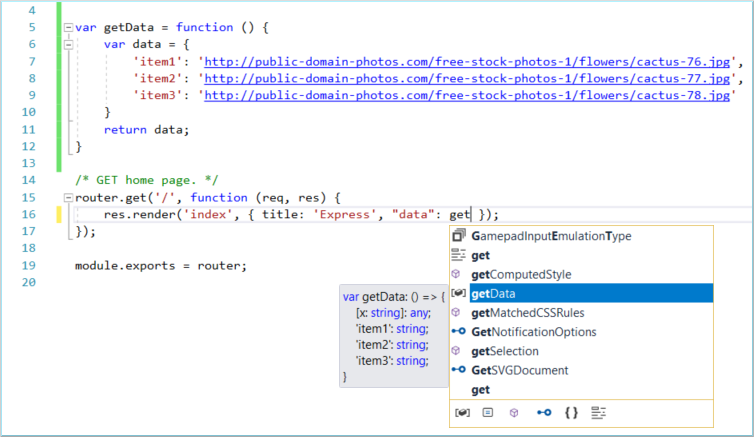
Remove the comma earlier
"data". Greenish syntax highlighting appears on the expression. Hover over the syntax highlighting.
The concluding line of the bulletin tells you that the JavaScript interpreter expected a comma.
-
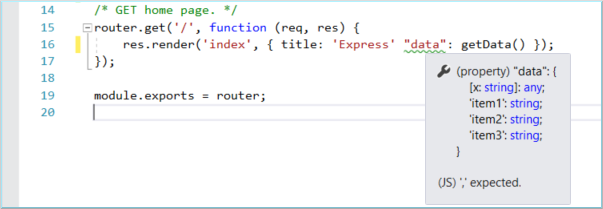
In the lower pane, select the Error List tab, and select Build + IntelliSense from the dropdown list for the blazon of issues reported.
The pane displays the warning and description forth with the filename and line number.


-
Ready the code past replacing the comma earlier
"data".The corrected line of lawmaking should expect similar this:
res.return('index', { championship: 'Express', "information": getData() }); -
If you'd like to navigate to the source code of
render, use ane of these options:- Select
renderand select F12. - Correct-click
renderand select Become To Definition from the context card.
These commands accept you to the definition of the
renderfunction in index.d.ts.
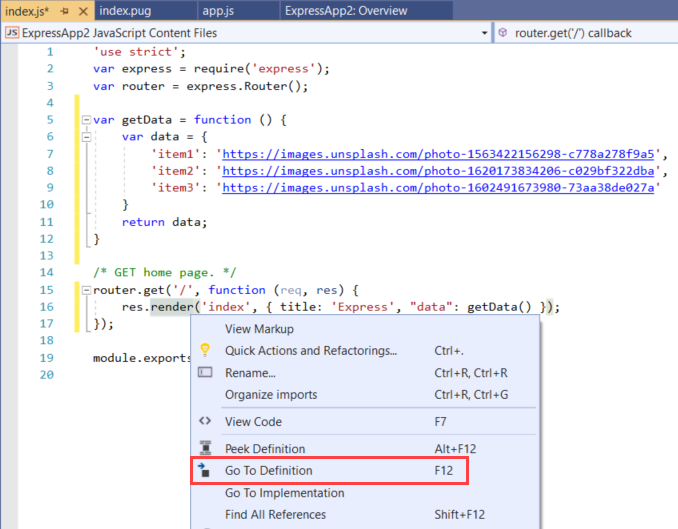
- Select
Run the app
Side by side, run the app with the Visual Studio debugger fastened. Before y'all do that, you need to set a breakpoint.
Set a breakpoint
Breakpoints are the most bones and essential feature of reliable debugging. A breakpoint indicates where Visual Studio should append your running lawmaking. You tin can then notice variable values, memory behavior, or whether a branch of lawmaking is running.
To prepare a breakpoint, in alphabetize.js, select the left gutter earlier the following line of lawmaking:
res.render('index', { title: 'Express', "data": getData() });


Run the app in Debug style
-
Select the debug target in the Debug toolbar, such as Spider web Server (Google Chrome) or Web Server (Microsoft Border).

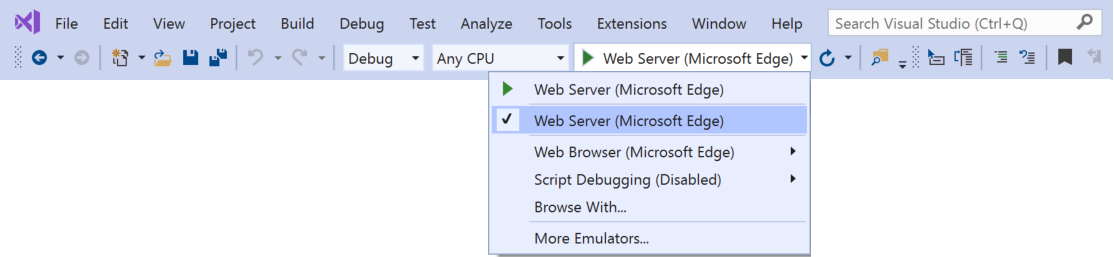

If y'all know your preferred debug target is available on your machine, but it doesn't appear as an option, select Scan With from the debug target dropdown list. Select your default browser target in the list, and select Set as Default.
-
Select F5 or select Debug > Commencement Debugging to run the app.
The debugger pauses at the breakpoint you set, so you tin inspect your app country.
-
Hover over
getDatato see its properties in a DataTip:

-
Select F5 or select Debug > Continue to continue running the app.
The app opens in a browser. In the browser window, you should see Express as the title and Welcome to Express as the outset paragraph.
-
Select the One!, 2!, and Three! buttons to brandish different images.

-
Close the web browser.
Publish to Azure App Service (optional)
-
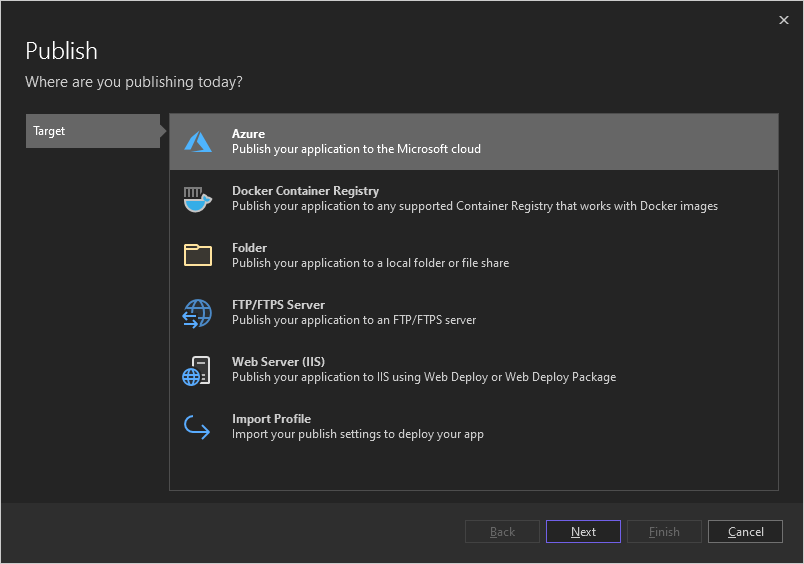
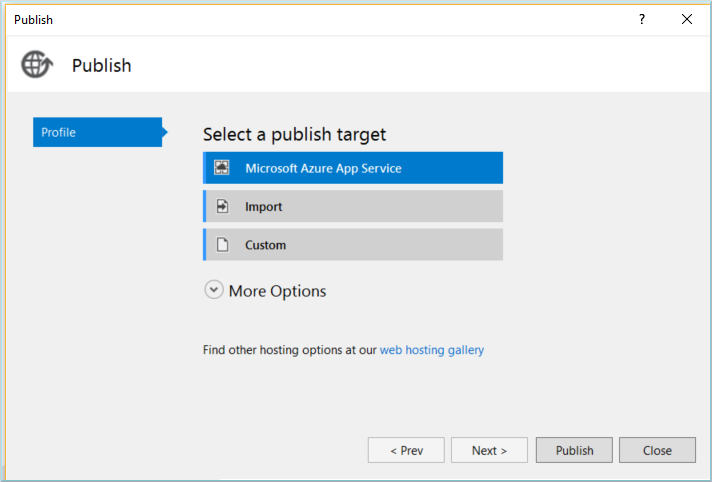
In Solution Explorer, right-click the project and select Publish.
- If prompted, select Add together a publish profile.
- If you're prompted to install Azure WebJob Tools, select Install.
-
On the offset Publish screen, select Azure, and and then select Adjacent.
-
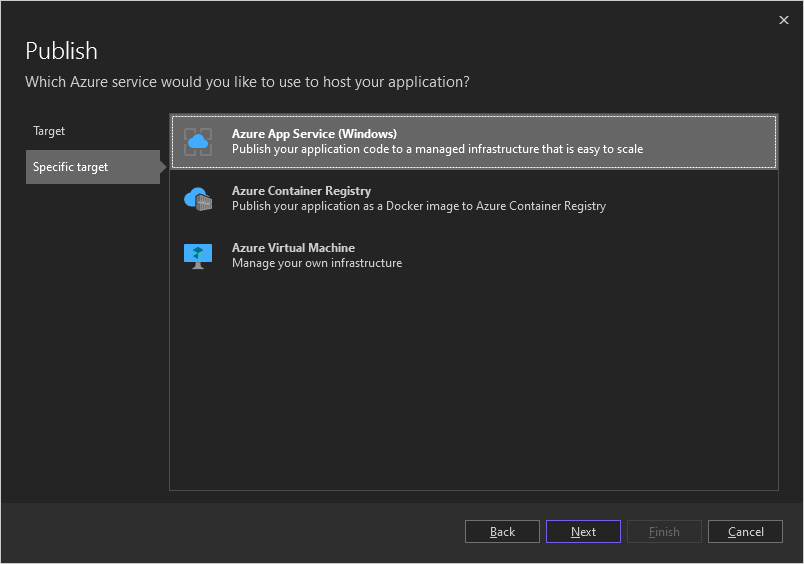
On the 2d Publish screen, select Azure App Service (Windows), and and then select Next.
-
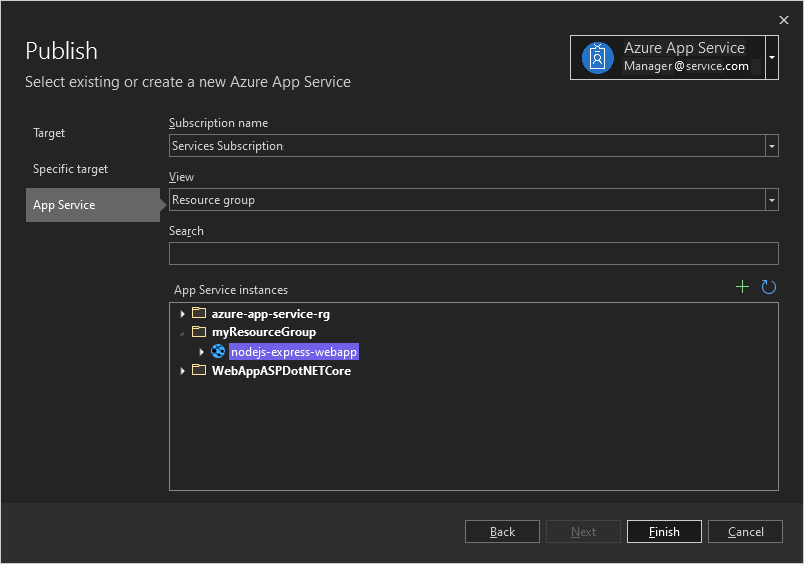
On the next screen, sign in to Azure if necessary. Select the Azure subscription, resources group, and App Service you lot want to publish to, and and so select Stop.
If you don't have an Azure subscription, resource group, or App Service, you can create them by following the prompts on this screen.
For more detailed instructions, see Publish to Azure website using web deploy.
-
Expect over the publishing configuration, and so select Publish.
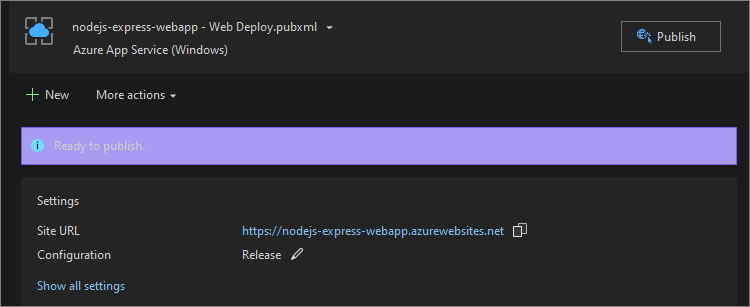
The Visual Studio Output window shows the Azure deployment progress.
-
On successful deployment, your app opens running in Azure App Service in a browser. Select a push to display an image.

-
In Solution Explorer, right-click the project and select Publish.
-
Select Microsoft Azure App Service.
In the App Service dialog box, you lot can sign into your Azure account and connect to existing Azure subscriptions.
-
Follow the remaining steps to select a subscription, select or create a resource group, and select or create an app service plan. When prompted, follow the steps to publish to Azure. For more than detailed instructions, see Publish to Azure website using spider web deploy.
-
The Output window shows the Azure deployment progress.
On successful deployment, your app opens in a browser running in Azure App Service. Select a button to display an image.

Congratulations on completing this tutorial!
Side by side steps
Feedback
Submit and view feedback for

How To Create A Windows Service In Visual Studio 2017,
Source: https://docs.microsoft.com/en-us/visualstudio/javascript/tutorial-nodejs
Posted by: kennedygurgend1980.blogspot.com
0 Response to "How To Create A Windows Service In Visual Studio 2017"
Post a Comment